15 Outdoor Kitchen Ideas for Summer Hosting
15 Outdoor Kitchen Ideas for Summer Hosting
There is a particular kind of summer evening that every host quietly aspires to. The kind where nobody is inside doing anything, where the cooking and the conversation are happening in the same place, where guests are perched on stools and leaning against counters and the smell of something good on the grill is doing half the entertaining on its own. An outdoor kitchen, done well, is what makes that evening possible rather than accidental.

The assumption that an outdoor kitchen requires a significant build, a gas line, and a landscape architect is worth setting aside immediately. Some of the most functional and genuinely enjoyable outdoor cooking setups cost less than a weekend away and can be assembled in an afternoon. Others are more considered and more permanent, but even those need not be as expensive or as complicated as the magazine versions suggest.
Whether you are working with a large paved terrace, a modest patio, a narrow side return, or simply a patch of garden with a decent surface underfoot, the ideas below cover every scale and every budget. Each one includes what you will need, what it will cost, and a practical tip to make the whole thing perform as well as it looks.
1. The Freestanding Grill Station
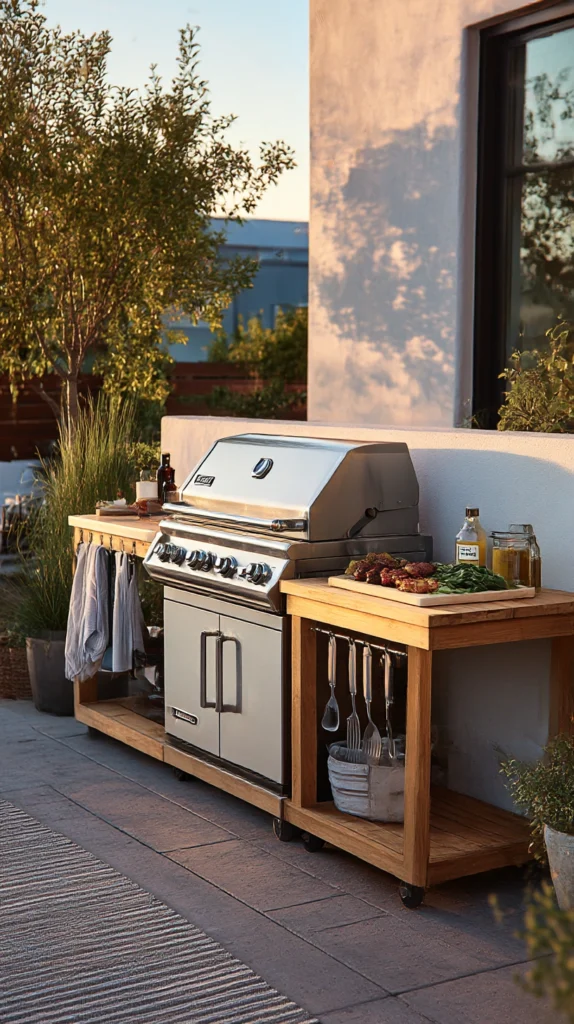
Budget: $80 – $400
A quality freestanding grill — gas, charcoal, or a combination — positioned on a stable surface with a small prep table beside it is the foundation of every outdoor kitchen on this list. It requires no installation, no permanent commitment, and no structural work. For anyone who has been cooking on a small tabletop grill or a basic kettle barbecue and wondering why the experience always feels slightly inadequate, the answer is almost always surface area — both on the grill itself and beside it.
A mid-range freestanding gas grill with at least two burners costs $150–$350. A quality charcoal kettle grill runs $80–$200. A dedicated prep table with a shelf beneath for fuel and tools runs $40–$100. Position the grill so the cook faces the guests rather than away from them — a grill that requires the host to turn their back on the party for twenty minutes is a social problem as well as a practical one.
Style tip: Treat the area immediately around the grill as a working kitchen rather than a garden feature. A non-slip mat under the prep table, a magnetic knife strip on a nearby post, and a hook rail for tongs and brushes turn a grill station into something that works like a kitchen rather than something that merely looks like one.
2. The Pallet Wood Prep Counter
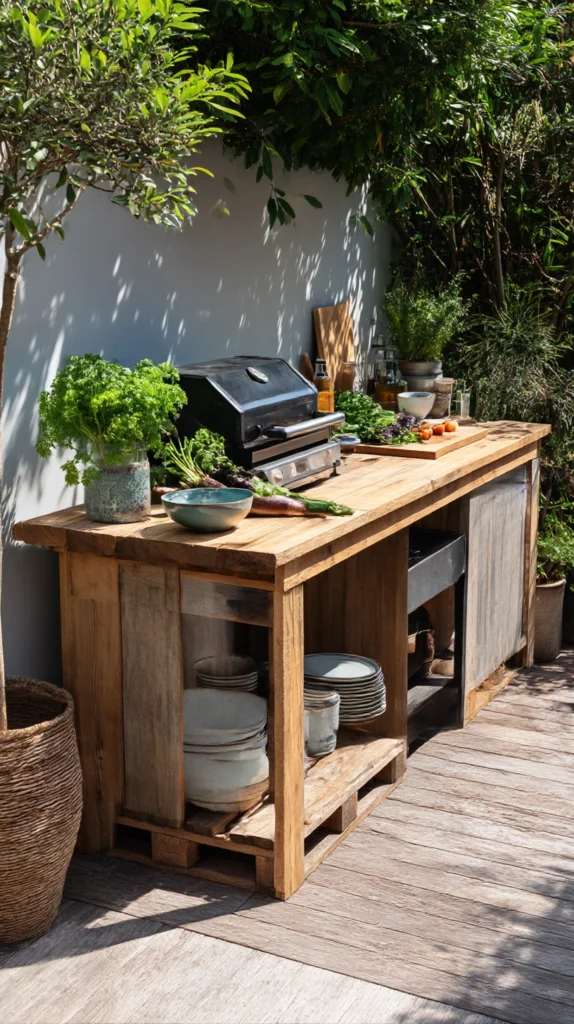
Budget: $20 – $80
Build a low prep counter from two or three heat-treated pallets stacked on their sides, sealed with exterior wood treatment, and topped with a piece of exterior-grade timber or a reclaimed scaffold board sanded smooth. It costs almost nothing, requires no specialist skills, and provides the one thing most outdoor cooking setups lack entirely: a dedicated surface at the right height for food preparation that is not the lid of the grill or a folding table that wobbles when you apply any pressure.
Heat-treated pallets cost $0–$10 each. A scaffold board or exterior timber plank for the worktop runs $15–$30. Exterior wood stain or paint costs $8–$15. Seal the worktop with at least two coats of exterior wood oil or sealant ($10–$20) to protect it from moisture and food stains. The finished counter, sanded and oiled, looks considerably more deliberate than its origins suggest.
Style tip: Cut the worktop so it overhangs the pallet base by 5–8 centimetres on the front and sides. An overhang gives the counter a proper furniture quality and provides a natural hand grip for moving it. A worktop that sits flush with the base looks like a board resting on pallets; an overhang looks like a counter.
3. The Outdoor Pizza Oven Setup

Budget: $150 – $800
A portable or tabletop pizza oven — gas-fired or wood-fired — changes the character of outdoor hosting more dramatically than almost any other single addition. Pizza made in a proper high-temperature oven in the garden, with guests watching and occasionally assisting, is not just a meal but an event, and the pizza oven quickly becomes the reason people come rather than simply the means by which they are fed.
A compact gas-fired portable pizza oven costs $150–$350. A wood-fired clay or stone oven starts at $250 and runs to $800 for a quality built version. A dedicated outdoor table or stand to position it at a comfortable working height costs $40–$80. Keep a simple dough recipe on a laminated card attached to the oven stand so guests can make their own — participation in the cooking is what separates a pizza oven evening from every other dinner party.
Style tip: Prepare all toppings in advance and present them in small bowls on a separate table beside the oven — a mise en place setup that lets guests assemble their own pizzas before passing them to the cook. The assembly station does as much to create atmosphere as the oven itself and removes the bottleneck of a single host managing both the dough and the toppings simultaneously.
4. The Outdoor Bar Cart Kitchen
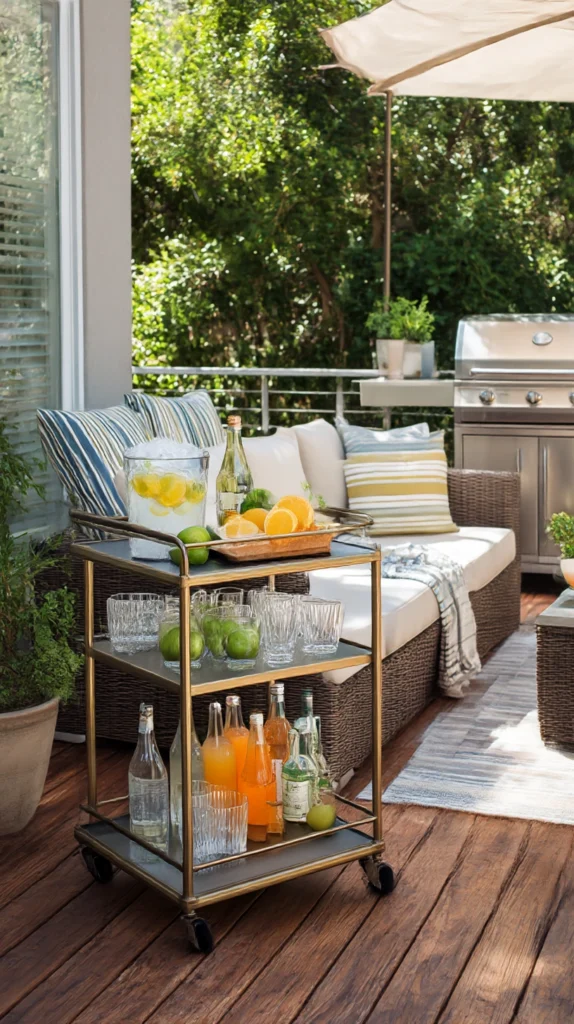
Budget: $60 – $250
A weatherproof bar cart positioned beside the grill — stocked with everything needed for drinks, garnishes, ice, and glasses — separates the drinks operation from the cooking operation and means the host is not constantly interrupted mid-cook by requests for a refill. The bar cart becomes the social hub while the grill is the working hub, and the two-station arrangement distributes the activity and the conversation across the outdoor space rather than concentrating everything in one place.
A weatherproof metal or rattan bar cart costs $50–$150. A countertop ice bucket ($20–$40) keeps drinks cold without requiring trips to the kitchen. A small chopping board for garnishes and a set of bar tools ($15–$30) complete the station. Label the bottles so guests can pour their own — a self-service drinks station removes the host from the drinks equation entirely and is the single most effective way of reducing the number of times a cook needs to leave the grill.
Style tip: Position the bar cart on the opposite side of the seating area from the grill rather than beside it. Two activity points at opposite ends of the space encourage guests to move around, create natural conversation clusters, and prevent the overcrowding around the grill that makes cooking while hosting genuinely difficult.
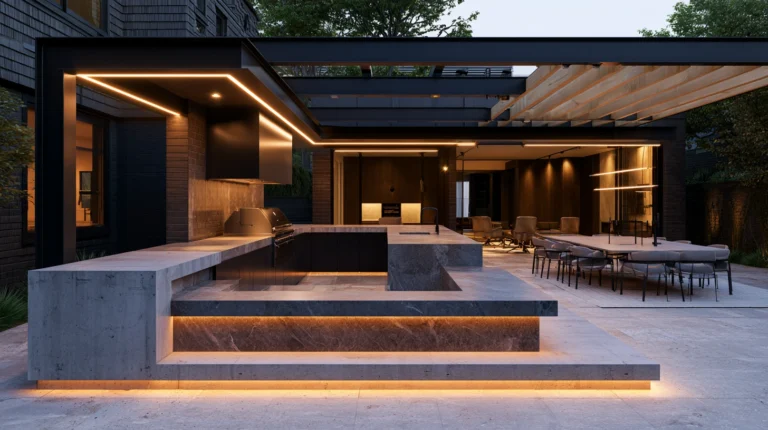
5. The Built-In Cinder Block Kitchen
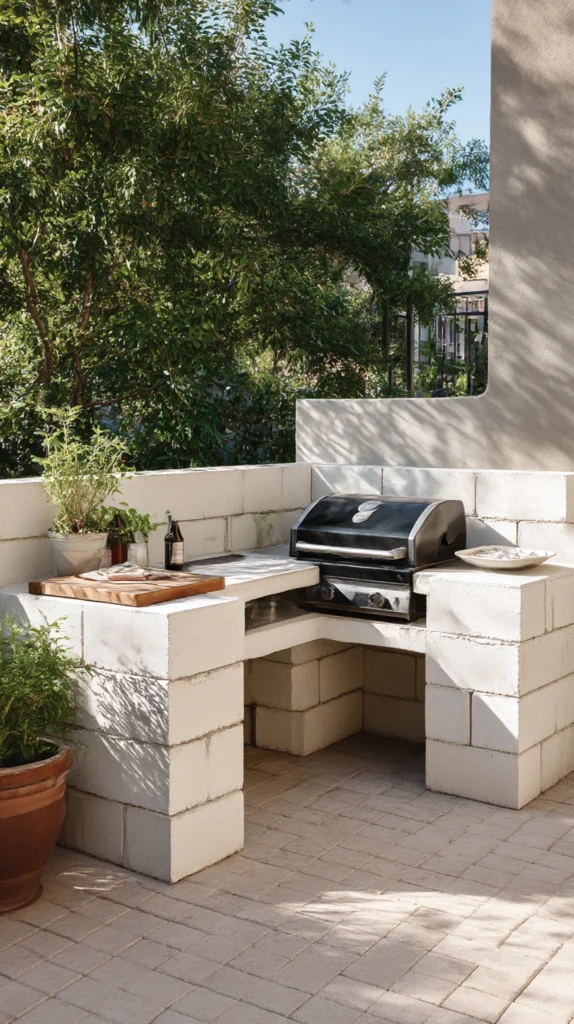
Budget: $100 – $400
Stack cinder blocks into an L-shaped or straight counter formation, fill the cavities with gravel for stability, top with a poured concrete slab or large porcelain tiles, and recess a grill insert or a simple fire grate into the structure. It is the most permanent outdoor kitchen on this list and the most kitchen-like — a fixed counter at the right height with storage beneath and a cooking surface built in. The materials cost almost nothing and the construction requires no specialist skills beyond a level and a tape measure.
Cinder blocks cost $1.50–$3 each — a standard L-shaped counter uses forty to sixty blocks. A poured concrete worktop costs $30–$60 in materials for a standard counter length. Large porcelain tiles ($2–$5 each) are a simpler alternative to poured concrete and require only tile adhesive and grout to install. A built-in charcoal grill insert runs $40–$80 and sits in a purpose-left gap in the block structure.
Style tip: Render the outside face of the cinder block structure with exterior mortar ($15–$25 for a bag) and paint it in an exterior masonry colour once dry. Unrendered cinder block looks industrial in a way that suits very few gardens; rendered and painted it reads as intentional architecture rather than construction material.
6. The Kamado Grill Outdoor Kitchen
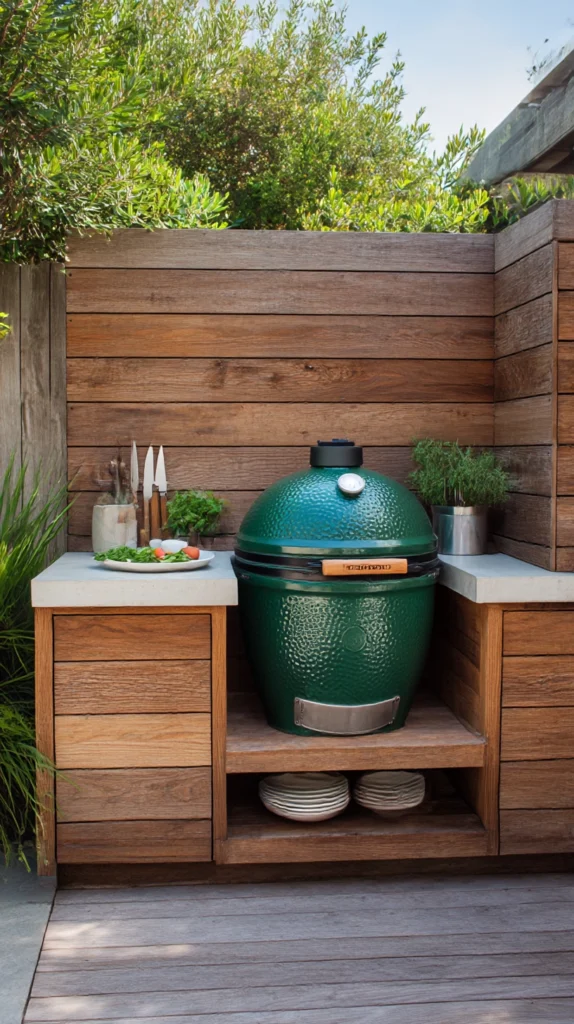
Budget: $300 – $1,200
A kamado grill — the thick-walled ceramic egg-shaped cooker — does more things well than any other outdoor cooking vessel. It grills, smokes, bakes, roasts, and sears, holds temperature with exceptional consistency in wind and cold, and lasts decades with minimal maintenance. Built into a simple timber or cinder block surround with a prep surface on either side, a kamado becomes the centrepiece of an outdoor kitchen that justifies the initial investment many times over.
A mid-range kamado grill costs $300–$700. A built timber or cinder block table surround with the kamado recessed in the centre costs $80–$200 in materials. The kamado’s weight (most models weigh 80–100 kilograms) means the table must be built in place rather than assembled elsewhere — plan the position carefully before building the surround because moving it afterward requires the same effort as building it again.
Style tip: Build the surround table 5 centimetres lower than standard kitchen worktop height. The kamado dome sits 30–40 centimetres above the table surface, and a standard-height table plus the dome height requires uncomfortable overhead reaching when opening the lid. A slightly lower table brings the lid handle to a natural working height.
7. The Outdoor Sink Station
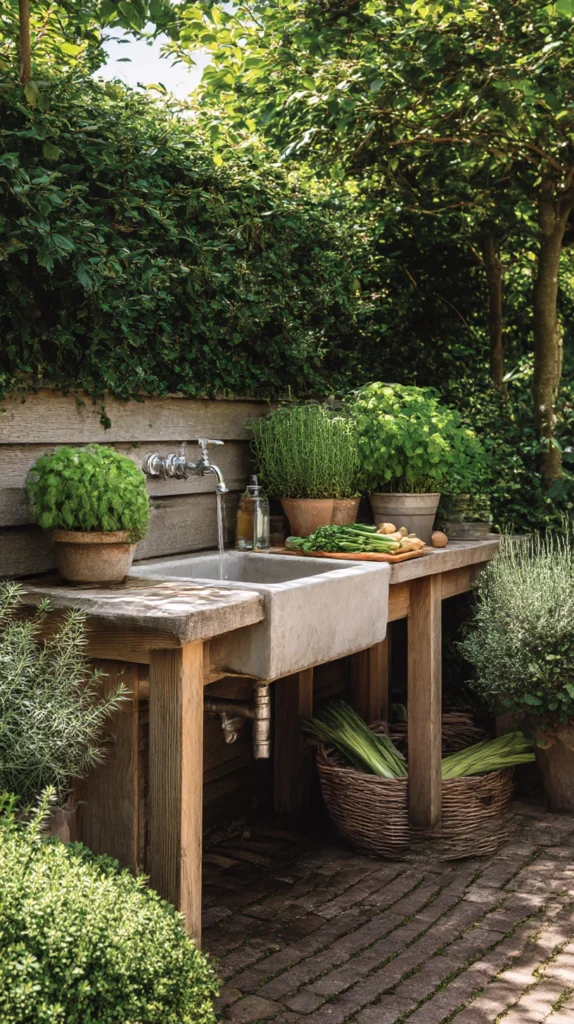
Budget: $60 – $300
An outdoor sink — connected to a garden tap via a simple hose fitting or plumbed with a permanent cold water supply — transforms outdoor cooking from an approximation of a kitchen into something that functions like one. Hand washing without going inside, rinsing produce at the prep counter, cleaning tools between tasks: the presence of water where the cooking is happening removes the most persistent friction in outdoor kitchen use.
A freestanding outdoor sink unit with a draining board costs $60–$150. A simple utility sink mounted to a timber frame costs $40–$80 in materials and an afternoon to build. Connection to an outdoor tap using a push-fit hose connector costs $10–$20 and requires no plumbing experience. A bucket beneath the drain outlet handles waste water if a permanent drain is not available — empty it after each use rather than allowing it to become a mosquito breeding site.
Style tip: Position the sink between the prep counter and the grill rather than at the end of the counter run. Sink-between-stations allows hand washing and produce rinsing in the natural flow of movement between preparation and cooking without requiring the cook to walk to the end of the setup and back. The sink is a tool, and its position should reflect how it will actually be used.
8. The Smokeless Fire Pit Cooker
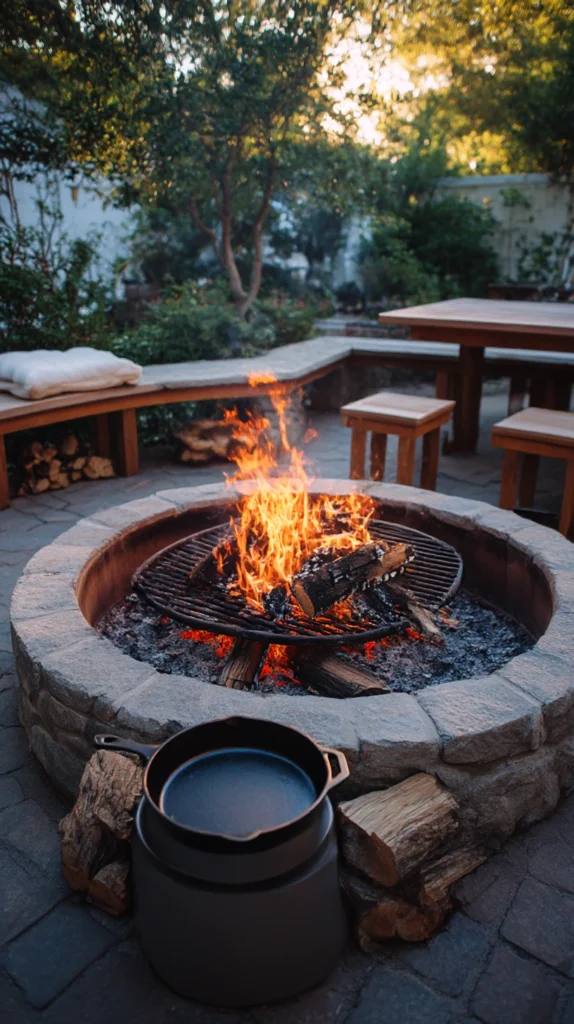
Budget: $80 – $350
A modern smokeless fire pit — the type that uses secondary combustion to burn off smoke before it escapes — combined with a cooking grate suspended above it provides a wood-fire cooking experience without the smoke management problems that conventional open fires create when guests are seated around them. The visual appeal of cooking over actual wood flame, combined with the practical benefit of not driving guests away with smoke, makes this setup one of the most enjoyable on the list for social cooking occasions.
A quality smokeless fire pit costs $80–$250. A compatible cooking grate or swing-arm grill attachment runs $30–$80. A cast iron skillet ($20–$40) used directly on the grate extends the cooking repertoire beyond grilling to sautéing, frying, and sauce making over the wood fire. Season the cast iron before the first outdoor use and it will outlast every other piece of cooking equipment in the outdoor kitchen.
Style tip: Use hardwood logs rather than softwood for cooking fires. Hardwood — oak, ash, cherry, apple — burns longer, produces more consistent heat, and imparts a better flavour to food than softwood, which burns fast, produces more smoke even in a smokeless pit, and contains resins that leave an unpleasant taste on food cooked directly above the flame.
9. The Modular Outdoor Kitchen System
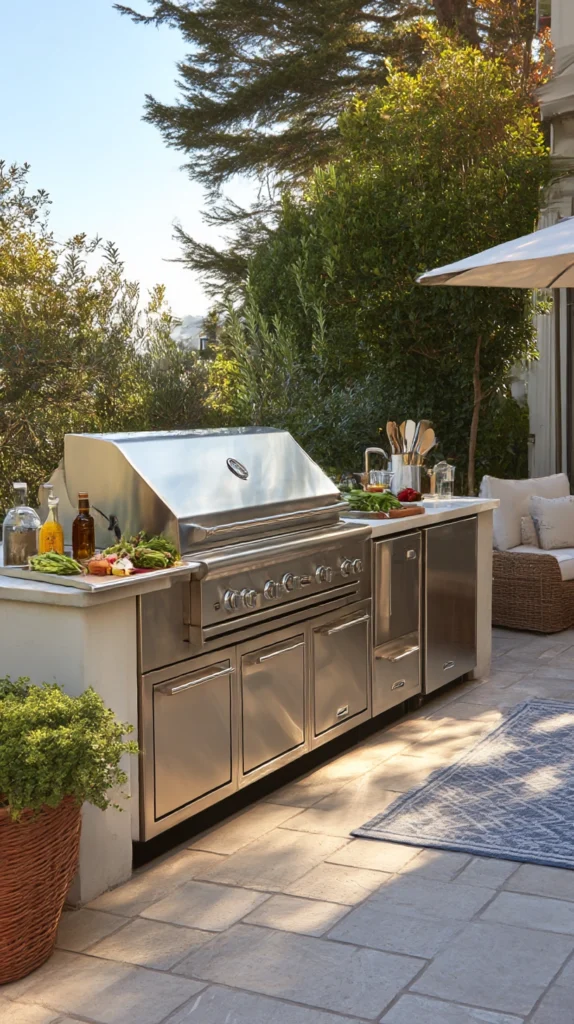
Budget: $200 – $800
Modular outdoor kitchen units — weatherproof cabinet bases in standard widths that accept a grill, a sink, a refrigerator drawer, or a plain worktop — allow an outdoor kitchen to be assembled, expanded, and reconfigured without any permanent installation. They look coherent and considered from the first unit and improve with each addition, and the initial investment in a two-unit base-and-grill configuration can grow over several seasons into a fully equipped cooking station without requiring any structural changes.
A single modular outdoor kitchen base unit costs $80–$200. A compatible built-in grill insert runs $100–$300. A matching worktop section costs $30–$80. Choose stainless steel or powder-coated aluminium frames rather than timber or MDF — outdoor kitchen units take more moisture than any other garden furniture and only fully weatherproof materials last beyond the first two seasons without warping, swelling, or corroding.
Style tip: Buy all units from the same modular system rather than mixing brands, even if an alternative brand offers a particular unit at a lower price. Modular kitchen systems from different manufacturers rarely align in height, depth, or rail spacing, and a mixed-brand outdoor kitchen looks misaligned in a way that a single-brand system, however modest, never does.
10. The Tiled Outdoor Counter
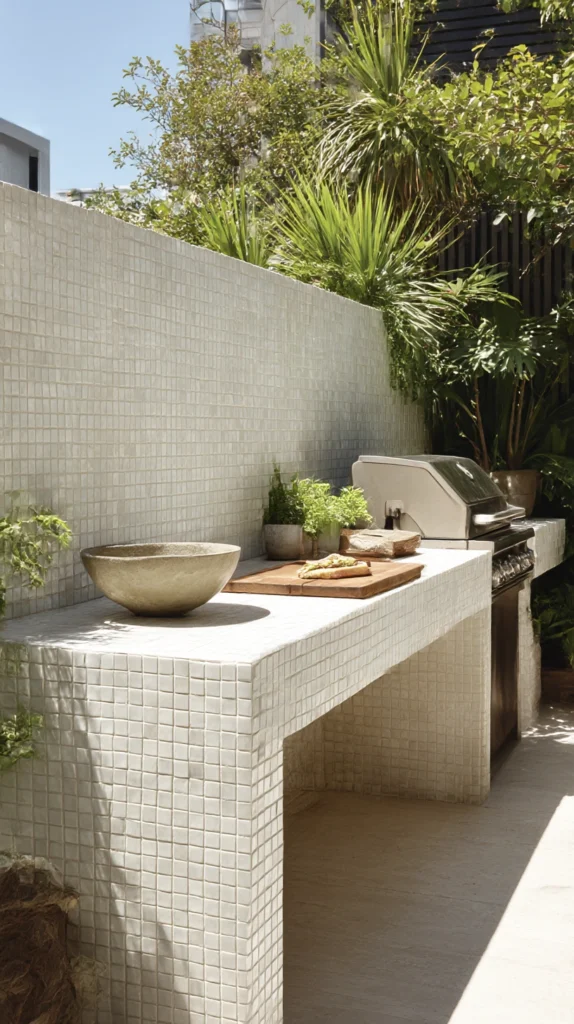
Budget: $80 – $300
Build a simple concrete block or brick counter at an appropriate height, top it with exterior porcelain or ceramic tiles in a colour and pattern that relates to the surrounding patio, and the outdoor kitchen acquires a permanence and a craftsmanship quality that no freestanding unit can replicate. Tiled surfaces are easy to clean, resistant to heat and moisture, and improve visually with age in a way that powder-coated metal and timber both eventually fail to do.
Exterior porcelain tiles cost $2–$6 each depending on size and finish. Tile adhesive and grout rated for outdoor use runs $15–$30. A basic concrete block counter structure costs $30–$80 in materials. Seal the grout lines with an exterior grout sealer ($10–$15) once the installation has cured for 28 days — unsealed outdoor grout absorbs moisture and food stains that become progressively harder to clean.
Style tip: Choose a tile with a slight texture or matte finish rather than a polished or glossy surface for an outdoor worktop. A glossy tile looks impressive in a showroom and becomes a practical problem outdoors — it shows every water mark, every fingerprint, and every cooking splash in a way that a matte tile of identical quality never does.
11. The Outdoor Fridge and Drinks Station
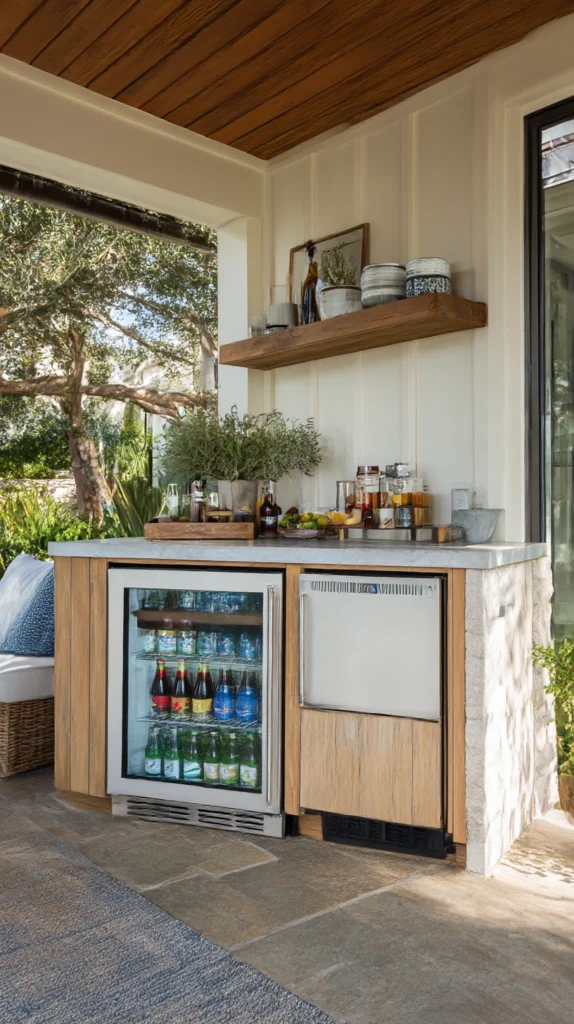
Budget: $150 – $600
An outdoor-rated refrigerator — built into a counter unit or freestanding under a covered section of the outdoor kitchen — eliminates the most common interruption in outdoor cooking and hosting: the trip inside for ingredients, drinks, or condiments. An outdoor fridge that keeps everything the cook needs within arm’s reach of the grill is not a luxury in a serious outdoor kitchen; it is the difference between an outdoor cooking experience and a continuous relay between the garden and the kitchen.
A compact outdoor-rated undercounter refrigerator costs $150–$400. A full-size outdoor fridge runs $300–$600. Standard indoor refrigerators used outdoors without weatherproofing fail quickly in direct sun and rain — the outdoor rating is not a marketing distinction but a genuine engineering difference in insulation, compressor specification, and moisture sealing. Position the fridge in the shadiest part of the outdoor kitchen to reduce compressor load and energy consumption.
Style tip: Stock the outdoor fridge exclusively with outdoor kitchen items — drinks, condiments, marinating ingredients, items needed for the day’s cooking — rather than using it as an overflow for the indoor fridge. An outdoor fridge that contains whatever did not fit inside requires the same searching and reorganising that the indoor fridge does; one stocked specifically for outdoor use works like a tool rather than a storage problem.
12. The Herb Garden Kitchen Wall
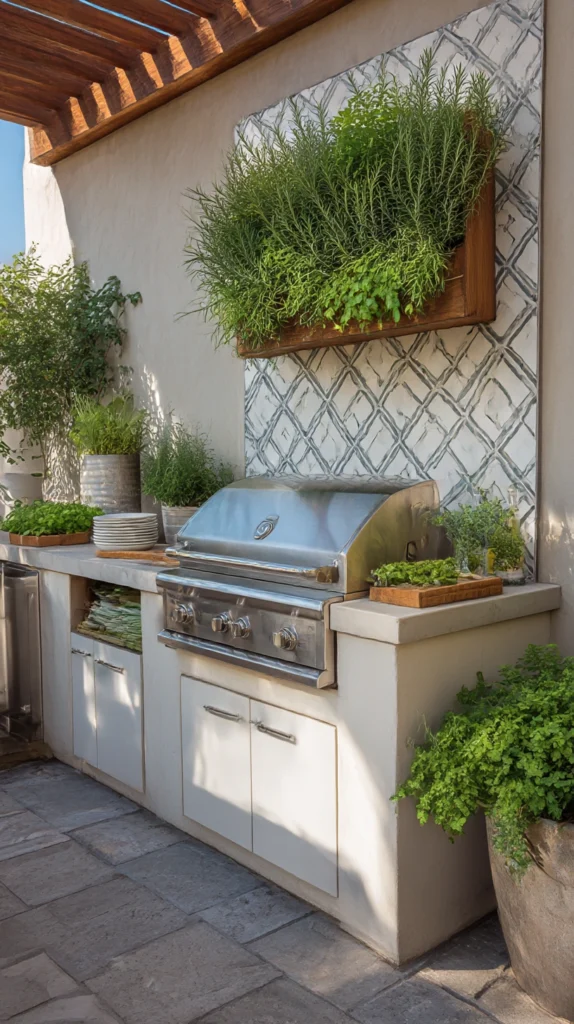
Budget: $30 – $100
Fix a row of wall-mounted planters on the fence or wall directly behind the outdoor kitchen counter and plant them with the herbs most commonly used in grilling and outdoor cooking — rosemary, thyme, oregano, basil, flat-leaf parsley. Herbs growing within arm’s reach of the grill are used; herbs growing in a pot at the other end of the garden are forgotten. The proximity of growing herbs to the cooking surface is the most practical argument for a kitchen herb wall and the most aesthetically pleasing addition to any outdoor cooking setup.
Wall-mounted metal planters cost $5–$12 each. Herb plants run $2–$4 each from a garden centre. A drip irrigation line connected to the nearest outdoor tap ($15–$25) keeps the herbs watered during busy hosting periods when individual pot watering is the first thing that gets forgotten. Plant each herb in its own pot rather than combining multiple herbs in a single long planter — different herbs have different water requirements and a shared container forces a compromise that suits none of them well.
Style tip: Position the herb wall at the end of the counter run closest to the grill rather than above the prep area. Herbs reach their peak aroma when a sprig is broken and added directly to something hot — the closer the herb wall is to the active cooking surface, the more likely the herbs are to actually be used during cooking rather than as an afterthought at the plating stage.
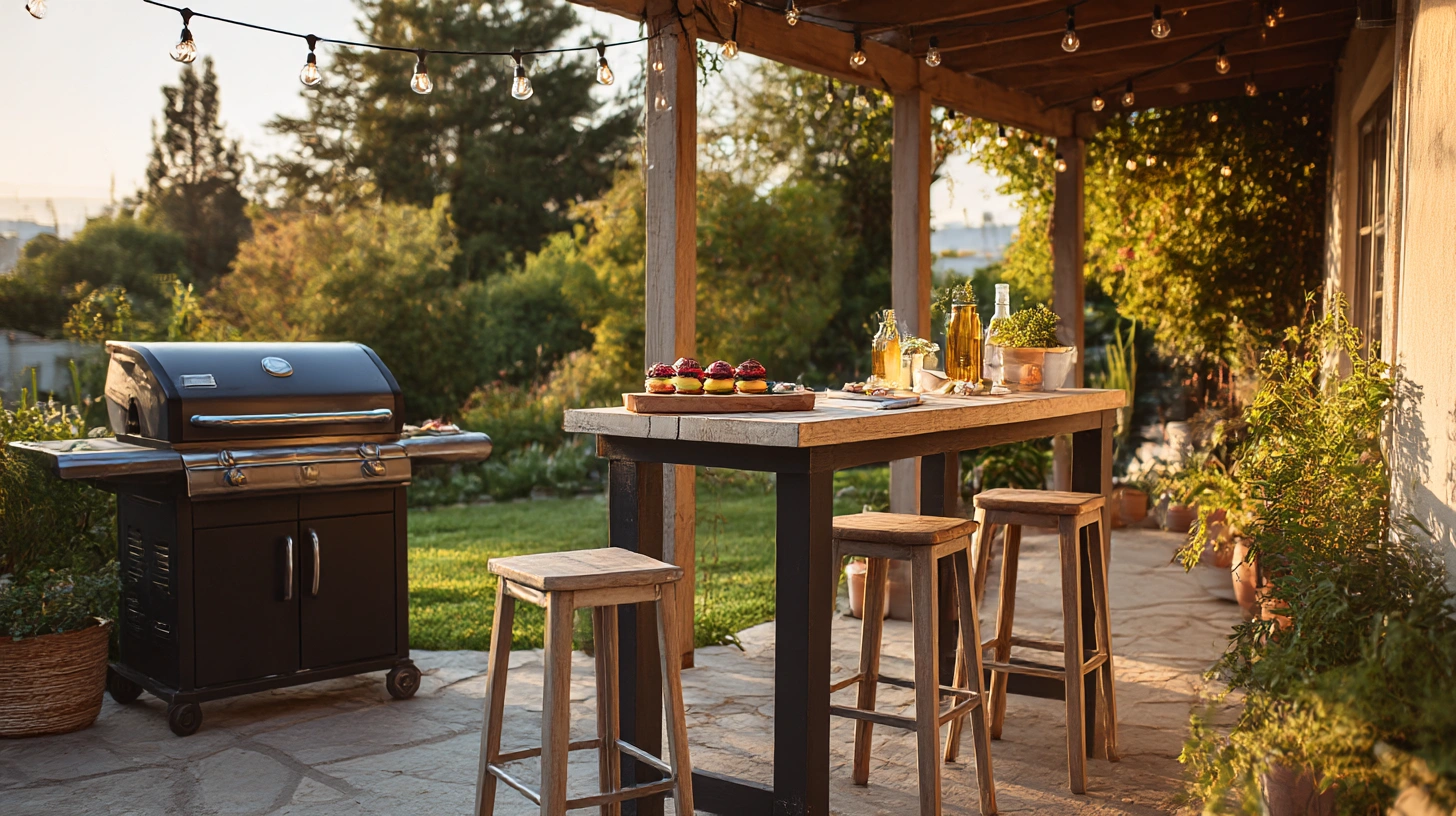
13. The Covered Pergola Kitchen
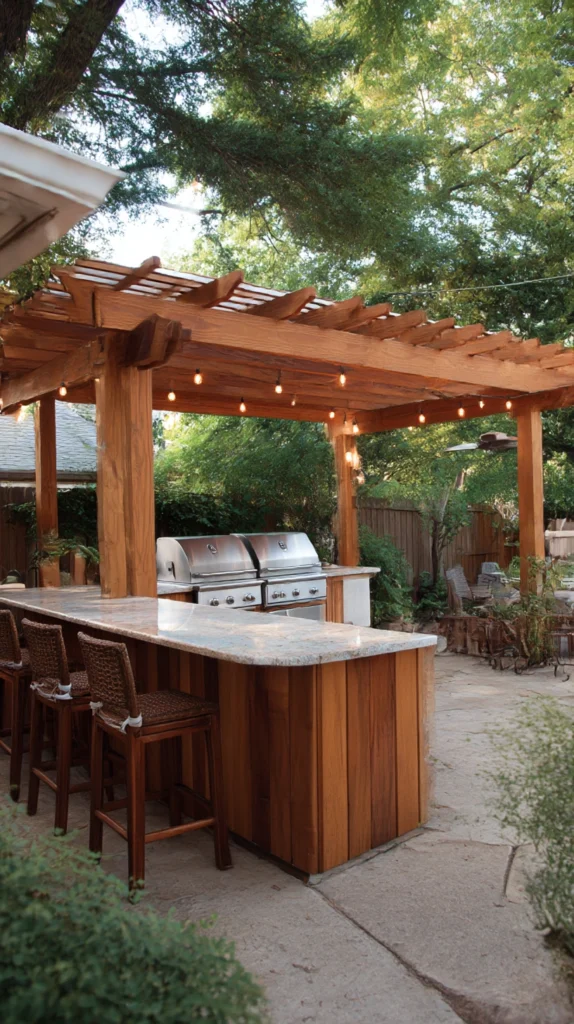
Budget: $200 – $1,000
A simple timber pergola over the outdoor kitchen area — four posts, a beam frame, and either a fixed roof panel, a retractable canopy, or a louvred roof system — transforms outdoor cooking from a weather-dependent activity into something that can happen on a cloudy evening, a light-rain afternoon, or in direct midsummer sun without discomfort. The covered structure also provides a natural anchor point for lighting, hanging rails, and the string lights that make any outdoor kitchen feel like somewhere to linger rather than simply cook.
A basic freestanding timber pergola kit costs $200–$500. A louvred aluminium pergola with adjustable roof slats runs $500–$1,500 but provides weather protection that a fixed timber roof cannot match. A retractable canopy fitted to an existing pergola costs $80–$200. Ensure the pergola is positioned so the prevailing wind carries grill smoke away from the covered seating area rather than under the roof and into the faces of the guests seated beneath it.
Style tip: Install lighting inside the pergola before the climbing plants or canopy go up rather than afterward. A string of festoon lights threaded through a pergola frame before the structure is planted or covered is a ten-minute job; the same task after a clematis has wound through every horizontal member is an afternoon of careful untangling.
14. The Two-Zone Grill Setup
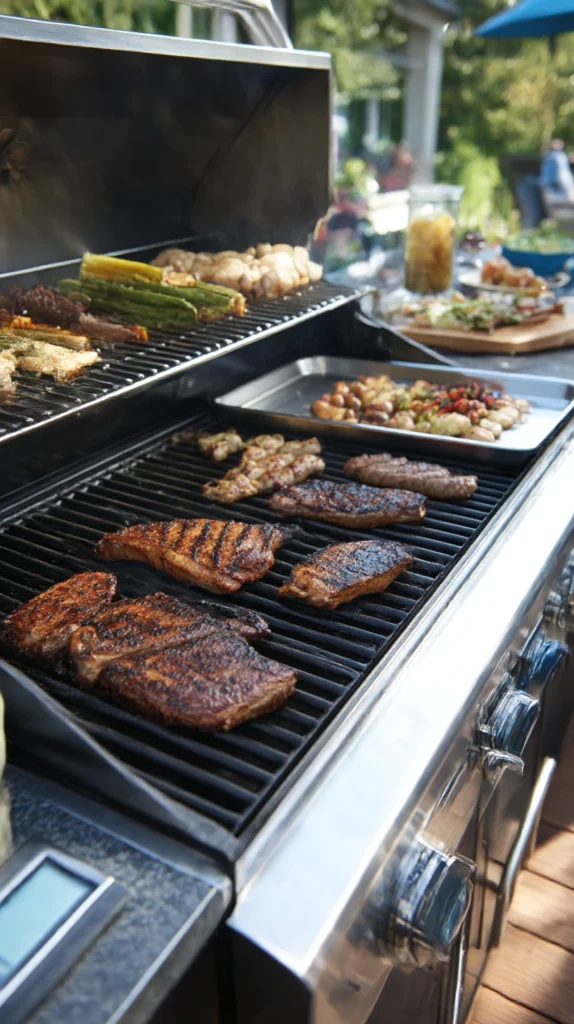
Budget: $150 – $600
A grill large enough to run two heat zones simultaneously — one side at high direct heat for searing, one side at lower indirect heat for finishing and keeping food warm — changes the quality of outdoor cooking more profoundly than any accessory, any surface, or any kitchen addition. Two-zone grilling allows the cook to manage multiple items at different stages without the binary choice between cooking and not cooking that a single-zone grill imposes.
A grill with sufficient cooking area for two zones requires at least 600 square centimetres of grate space — most three-burner gas grills and 57-centimetre or larger kettle grills provide this. A cast iron grill grate insert ($30–$60) adds restaurant-quality sear marks and heat retention to any existing grill. A quality instant-read thermometer ($15–$35) eliminates the guesswork from the indirect zone and is the most consistently useful grill accessory available.
Style tip: Use the indirect zone as a holding area rather than simply a lower-heat cooking zone. Food that has finished cooking on the direct zone can rest in the indirect zone while remaining warm and continuing to carry over cook — the same principle as resting meat on a rack in a warm oven, applied to the grill. It removes the time pressure of synchronising multiple items and allows the host to cook at a relaxed pace rather than a reactive one.
15. The Outdoor Kitchen Lighting Plan
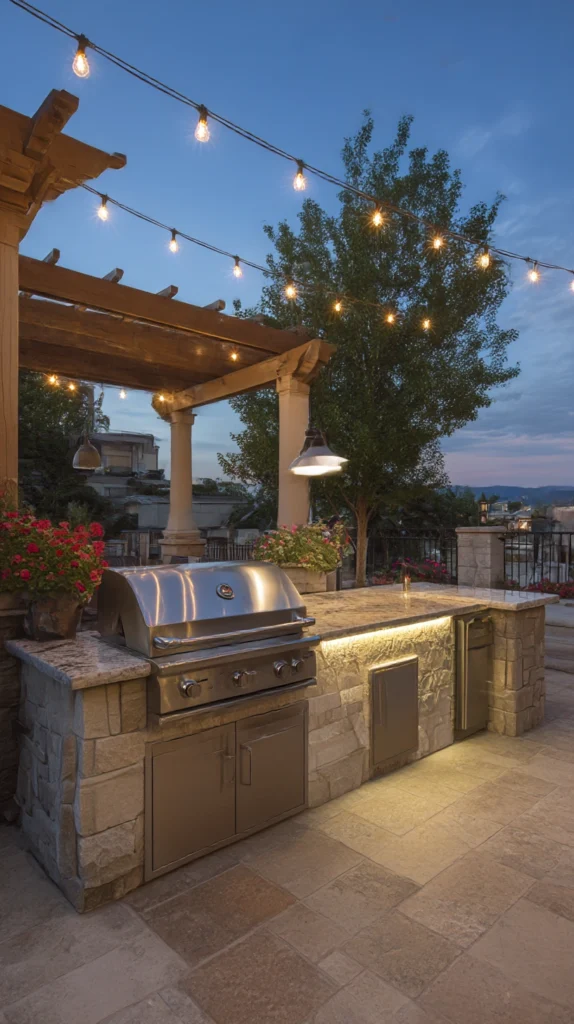
Budget: $40 – $200
An outdoor kitchen without dedicated task lighting is a cooking space that stops working the moment the sun goes down, which in summer hosting is precisely when it is most needed. Overhead festoon lights provide atmosphere but not precision; the cooking surface, the prep counter, and the bar station each need a directed light source that allows the work being done there to continue after dark without straining.
Under-counter LED strip lights ($15–$30 per metre) provide excellent task lighting for prep and bar surfaces and are straightforward to install with waterproof adhesive backing. A clip-on grill light ($15–$30) attaches to the grill handle and illuminates the cooking surface directly. Festoon lights above the dining area ($20–$50 for a 5-metre string) handle the ambient lighting while the task lights handle the functional requirement. Run all lights from a single outdoor extension lead with a switch accessible from the cooking position.
Style tip: Install the task lighting before the first summer hosting occasion rather than discovering its absence mid-evening with guests already seated. The transition from daylight to darkness on a summer evening happens faster than expected and the moment when the cooking surface becomes difficult to see is always earlier than anticipated. Good lighting is infrastructure, not decoration, and like all infrastructure it is most noticed when it is absent.
The best outdoor kitchen is not the largest one or the most equipped one — it is the one that keeps the host in the garden rather than constantly retreating to the house, that puts everything needed within arm’s reach of the cooking surface, and that makes guests feel the evening was designed around them rather than despite them. Get the cooking surface right, get the prep space right, and get the lighting right, and the rest follows naturally.
Start with what you will use most and build outward from there. A summer of genuinely good outdoor cooking is a better return on investment than any piece of garden furniture, and it begins with putting the right tools in the right place before the first guests arrive.