15 Stylish Backyard Patio Ideas for the Perfect Outdoor Setup
15 Stylish Backyard Patio Ideas for the Perfect Outdoor Setup
There is a version of the backyard patio that serves its purpose adequately and communicates nothing beyond the fact that someone needed somewhere to put the garden furniture. A slab, a table, four chairs, and the back wall of the house behind it. Functional, inoffensive, and entirely without personality — the outdoor equivalent of a room that was furnished rather than designed.
The genuinely stylish patio is a different proposition. It is a patio where the surface material was chosen rather than defaulted to, where the furniture arrangement was considered rather than arranged for convenience, where the evening light was planned rather than left to whatever security lamp came with the property. It is an outdoor room rather than an outdoor floor, and the gap between the two is closed by the quality of the decisions made rather than the size of the budget that funded them.
Each idea below is a specific approach to one element of the stylish backyard patio. Each includes what you will need, what it will cost, and a practical tip to make it work as well as the outdoor room it is reaching for.
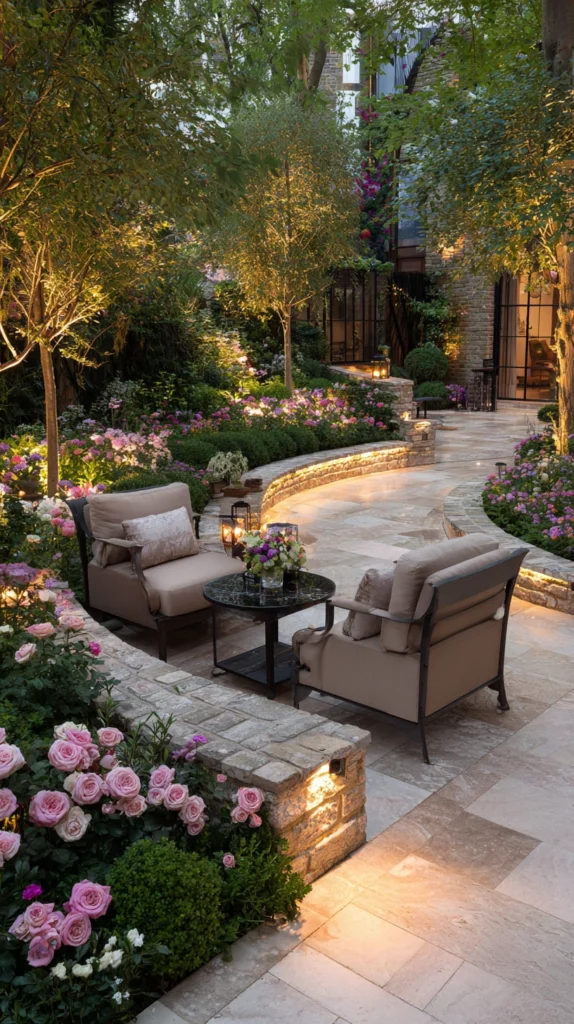
1. The Mixed Material Patio Surface
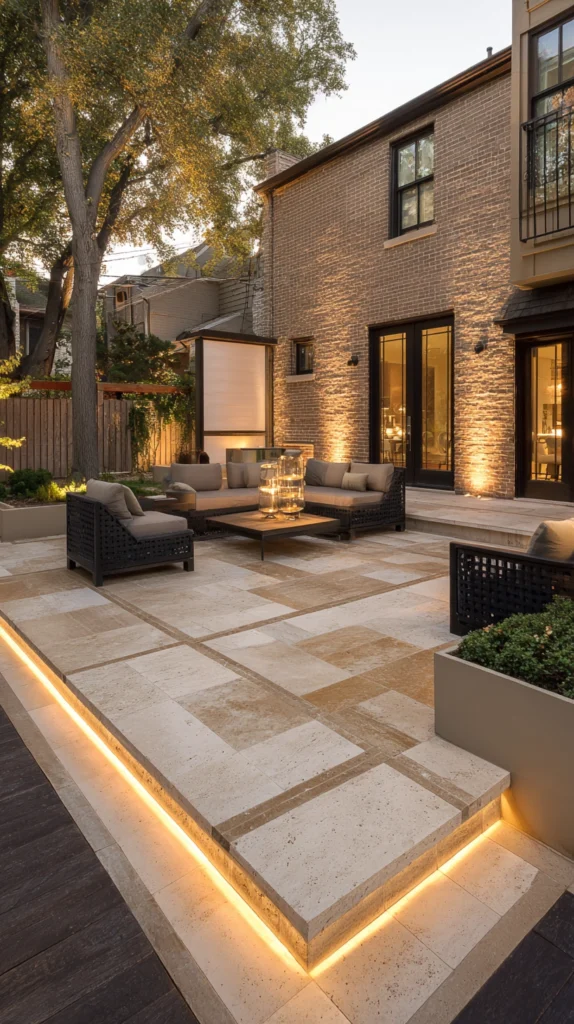
Budget: $300 – $2,000
A patio surface that combines two complementary materials — natural stone paving with brick border courses, concrete slabs with gravel infill joints, timber decking with stone tile inserts — creates a floor of considerably more visual interest and design intention than a single material applied uniformly. The material combination communicates that the patio floor was designed rather than simply laid, and the visual complexity of the joint between two materials gives the surface something worth looking at underfoot.
Large sandstone pavers combined with a contrasting brick edging course cost $25–$60 per square metre for the stone plus $5–$10 per linear metre for the brick border. Concrete slabs with gravel joints run $15–$40 per square metre. The mixed material approach requires planning the material proportion before installation — the dominant material should occupy at least seventy percent of the surface and the accent material the remaining thirty percent or less.
Style tip: Use the accent material to define the zone boundaries of the patio rather than as a random pattern within the primary surface. A brick edging that follows the perimeter of the dining zone reads as a designed zone boundary; the same brick distributed randomly through the stone reads as a pattern. The zone-defining use of the accent material gives the patio its spatial organisation as well as its visual interest.
2. The Zoned Patio Layout
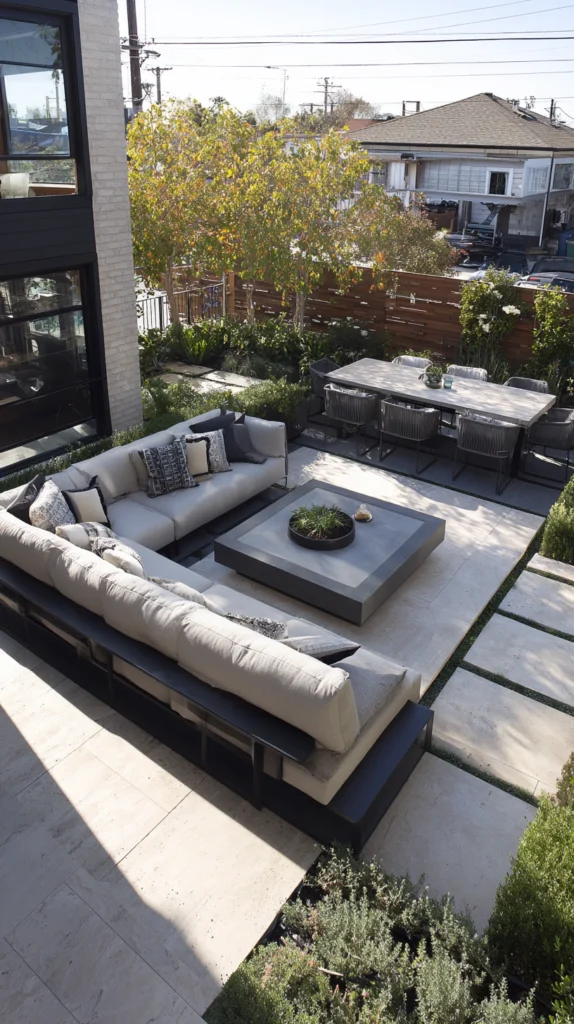
Budget: $100 – $600
Dividing the patio into defined zones — a dining zone, a lounge zone, and a transition zone between them — using different floor materials, different rug areas, different overhead structures, or simply different furniture configurations creates the patio that functions as multiple outdoor rooms rather than as a single undifferentiated surface. A patio with defined zones is always more useful, more comfortable, and more visually interesting than one with the same furniture distributed without organisational logic.
Zone boundaries can be created with: an outdoor rug in each zone ($60–$180 per rug), a change in floor level of 15–20 centimetres ($200–$500 in decking or paving), a planted border between zones ($40–$120 in plants), or a pergola structure above one zone ($300–$1,000). The zones do not need to be equal in size — the dining zone should be sized for the dining table plus chair clearance, the lounge zone for the sofa and coffee table arrangement.
Style tip: Leave a clear path of at least 90 centimetres between zones rather than allowing furniture from adjacent zones to touch or overlap. A clear path between zones communicates that the zones were designed as separate spaces; furniture that overlaps zone boundaries communicates that the space ran out before the arrangement was complete.
3. The Statement Outdoor Sofa
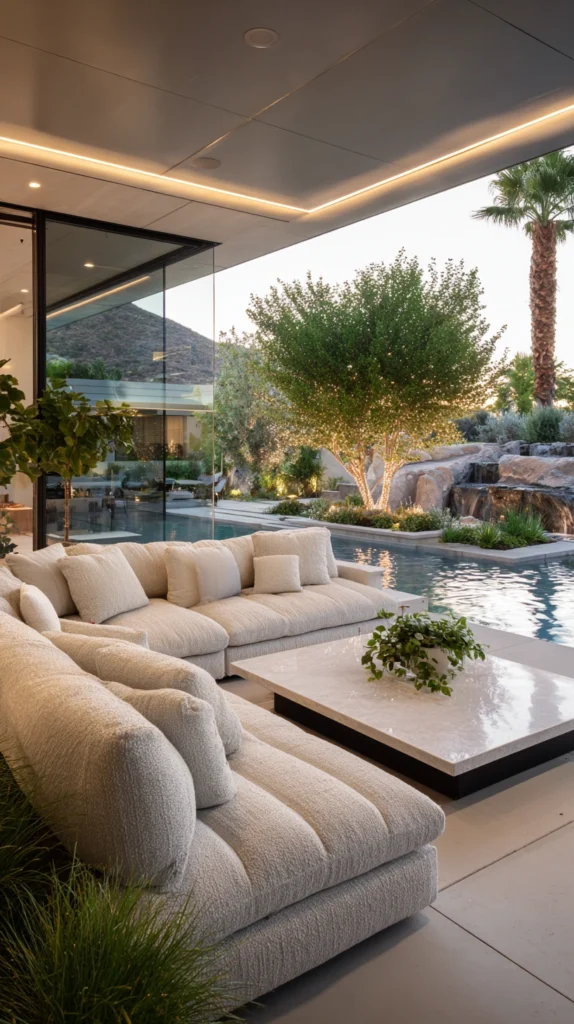
Budget: $300 – $1,500
A proper outdoor sofa — not a garden bench with cushions but an actual sofa with deep seats, proper arm rests, and cushions of genuine thickness — is the single furniture investment that most completely changes the quality of time spent on the patio. A sofa communicates that the patio was designed for staying rather than sitting, for hours rather than minutes, for the full progression of a summer evening rather than a brief outdoor interval.
A powder-coated aluminium outdoor sofa with cushions costs $300–$800. An all-weather rattan version runs $400–$1,200. A modular outdoor sofa that can be configured for different arrangements costs $500–$1,500. Choose a seat depth of at least 75 centimetres — shallower seats feel adequate for upright sitting and inadequate for the relaxed, reclined position that a sofa is specifically designed for.
Style tip: Position the sofa facing outward toward the garden rather than facing the house. A sofa that looks at the garden makes the garden the view and the patio the vantage point from which it is appreciated; a sofa facing the house makes the patio feel like an anteroom to the indoor space rather than a destination in its own right.
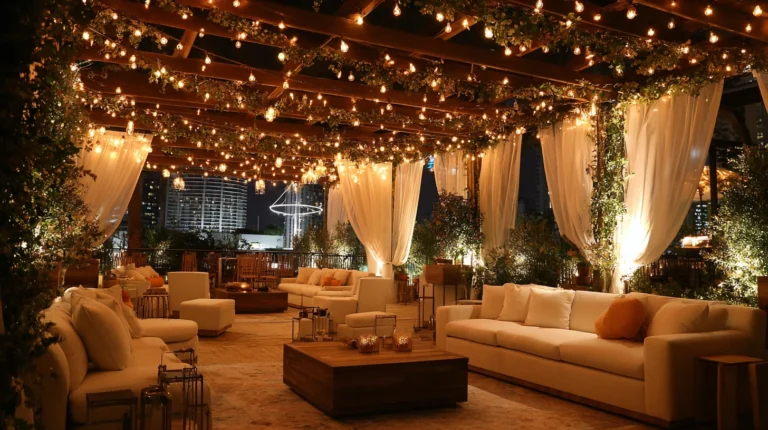
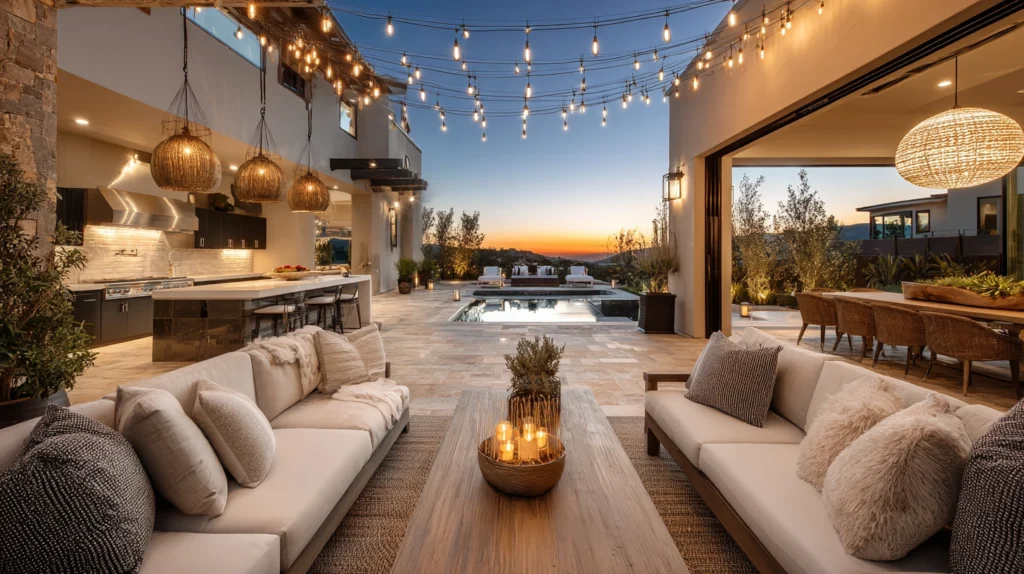
4. The Overhead Festoon Light Canopy
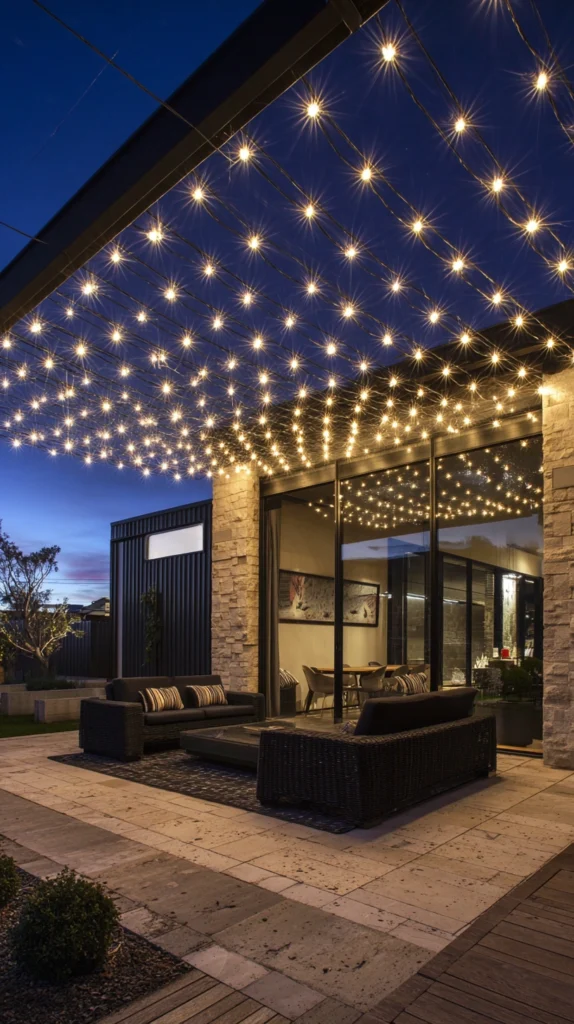
Budget: $30 – $150
Warm white festoon lights strung in parallel lines across the patio ceiling — from the house wall to the pergola, from post to post, in a configuration that creates a consistent overhead light canopy — transform the patio at the moment the best part of the summer day begins. A patio with no overhead light closes at sunset; one with a warm light canopy opens at dusk into its most beautiful and most atmospheric version.
Festoon lights with globe bulbs on a 5-metre string cost $20–$60. A 10-metre reel of smaller warm white fairy lights runs $10–$25. Connect to an outdoor timer socket ($8–$15) so the lights activate automatically at dusk — a light canopy that requires switching on manually is switched on inconsistently and therefore underperforms relative to its potential.
Style tip: String the festoon lights in parallel rows spaced 60–80 centimetres apart rather than in a single zigzag. Parallel rows create a consistent canopy effect; a single zigzag creates a pattern that reads as decoration. The parallel row configuration produces the quality of a designed lighting installation rather than a string of lights that was threaded between two points.
5. The Built-In Planter Borders
Budget: $150 – $800
Raised planter beds built into the edges of the patio — constructed from the same material as the patio paving, at a height of 40–60 centimetres, planted with fragrant and architectural species — integrate the planting into the patio architecture rather than treating it as an addition. Built-in planters communicate that the garden and the patio were designed as a continuous environment rather than as a hard surface with pots placed on it afterward.
Rendered block planters built into the patio edge cost $80–$300 per linear metre. Corten steel planter edges run $50–$200 per linear metre. Timber sleeper planters cost $40–$150 per linear metre. Plant the built-in borders with a combination of structural plants — an olive, a phormium, an agapanthus — and fragrant infill species — lavender, rosemary, scented geraniums — so the planters provide both visual structure and olfactory pleasure.
Style tip: Cap the built-in planter wall with the same stone as the patio surface rather than a contrasting material. A planter capped in the same paving material reads as part of the patio architecture; one capped in a contrasting material reads as a structure added to the patio. The material continuity between the patio floor and the planter cap is the detail that makes the built-in border genuinely built-in.
6. The Outdoor Kitchen Zone
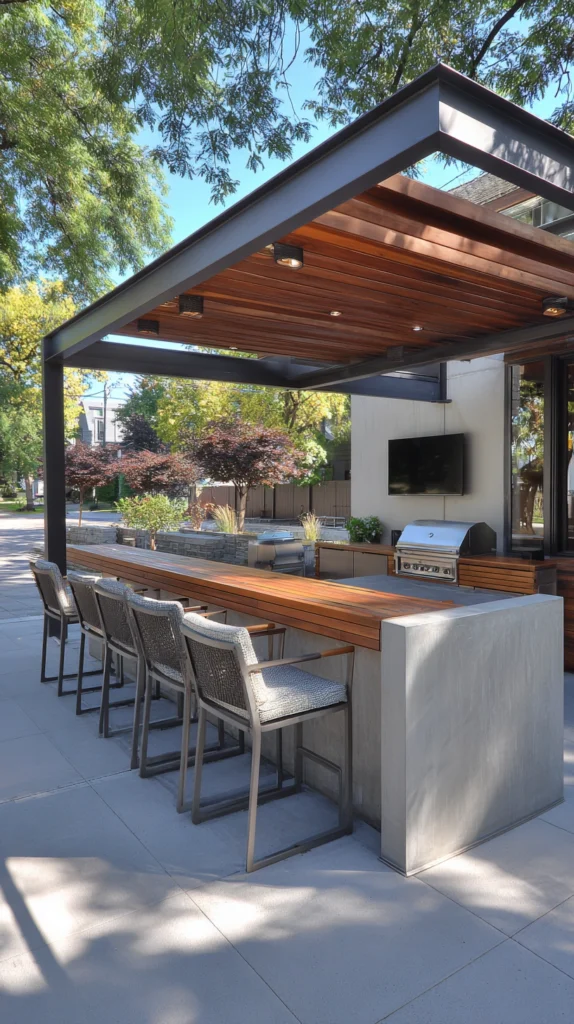
Budget: $200 – $2,000
A properly equipped outdoor kitchen zone — a grill or a pizza oven, a prep counter with storage beneath, an outdoor sink connected to the water supply, and an overhead structure to provide shade and a mounting point for lighting and tools — creates the most functional and most genuinely hospitable of all patio additions. The outdoor kitchen communicates that the patio is a serious outdoor living space rather than a place where the barbecue happens to be.
A built-in outdoor grill costs $200–$600. A prep counter in cinder block and tile costs $100–$400. An outdoor sink connection runs $80–$200 in materials. An overhead pergola structure above the kitchen zone costs $200–$600. The outdoor kitchen zone should be positioned so the cook faces the guest seating — the social quality of outdoor cooking depends entirely on whether the cook participates in the conversation while managing the grill.
Style tip: Install the outdoor kitchen zone lighting before the overhead structure is planted with climbers rather than afterward. A lighting cable routed through a pergola post before the wisteria grows through it is invisible and permanent; the same cable added after the climber is established requires either visible surface mounting or the dismantling of what the plant has built.
7. The Water Feature Sound Element

Budget: $50 – $400
A water feature on or adjacent to the patio — a self-contained fountain, a wall-mounted water blade, a raised pool with a bubble jet — adds the acoustic dimension that distinguishes a genuinely pleasant outdoor space from one that is merely comfortable. The sound of moving water masks the ambient noise of the urban environment, fills the silence that an empty garden produces, and creates a quality of presence that makes the patio feel genuinely inhabited rather than simply occupied.
A self-contained solar fountain bowl costs $30–$80. A wall-mounted water blade in stainless steel runs $150–$400. A raised pool with a submersible bubble pump costs $200–$600. Position the water feature within earshot of the primary seating area rather than at the far end of the garden where its acoustic contribution does not reach the seated occupants.
Style tip: Install the water feature on the same side of the patio as the prevailing breeze rather than on the sheltered side. Water sound carried toward the seating area on a light movement of air is more ambient and more consistently present than water sound from a feature positioned where the breeze carries the sound away from the seated position.
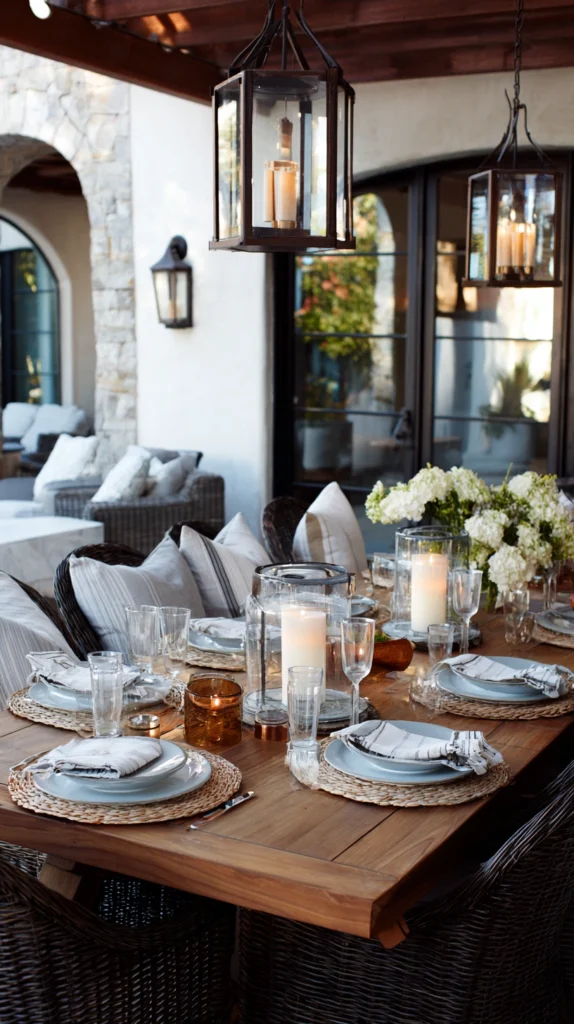
8. The Dining Table With Statement Lighting
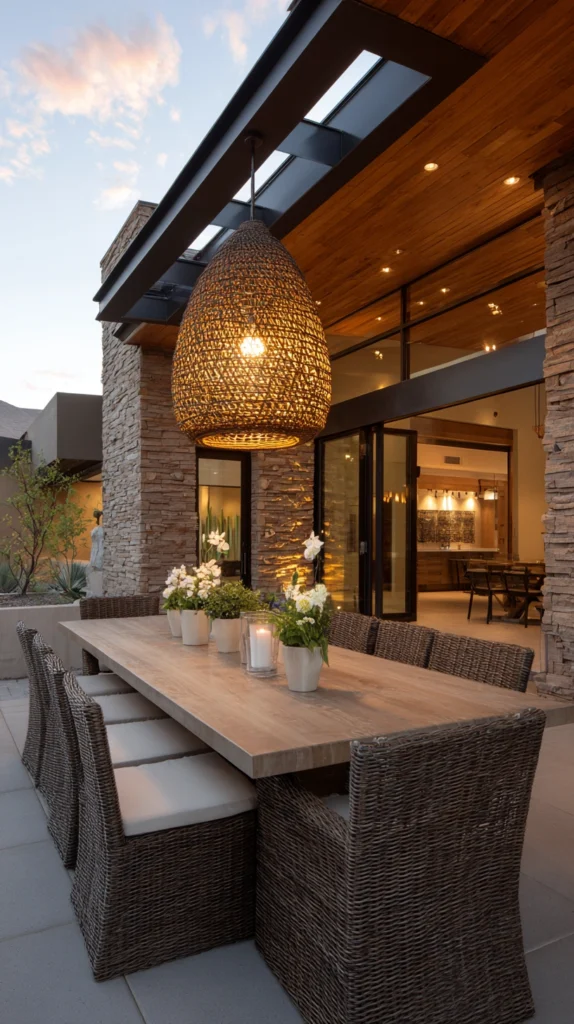
Budget: $200 – $1,000
An outdoor dining table positioned beneath a statement pendant light — hung from a pergola beam or from a ceiling-mounted fitting at the correct height of 70–80 centimetres above the table surface — creates the most complete and most specifically restaurant-quality outdoor dining experience. The pendant above the table communicates that the outdoor dining position was designed as a place to eat and linger rather than as a table placed wherever it fitted.
An outdoor dining table for six costs $200–$600. A statement pendant in a weatherproof format — rattan, ceramic, or metal — runs $60–$250. The pendant should be on a dimmer — a smart bulb with dimmer function costs $8–$15 — so the light above the table can be adjusted from the functional brightness of a meal to the atmospheric brightness of the conversation that follows.
Style tip: Choose a pendant width that is approximately one-third of the table length — a 1.8-metre table suits a pendant of 60–70 centimetres in diameter. A pendant that is too small for the table it illuminates reads as inadequate; one that is too large reads as heavy and overwhelming. The proportional relationship between the pendant and the table is the specification that determines whether the combination reads as designed.
9. The Retractable Awning Investment
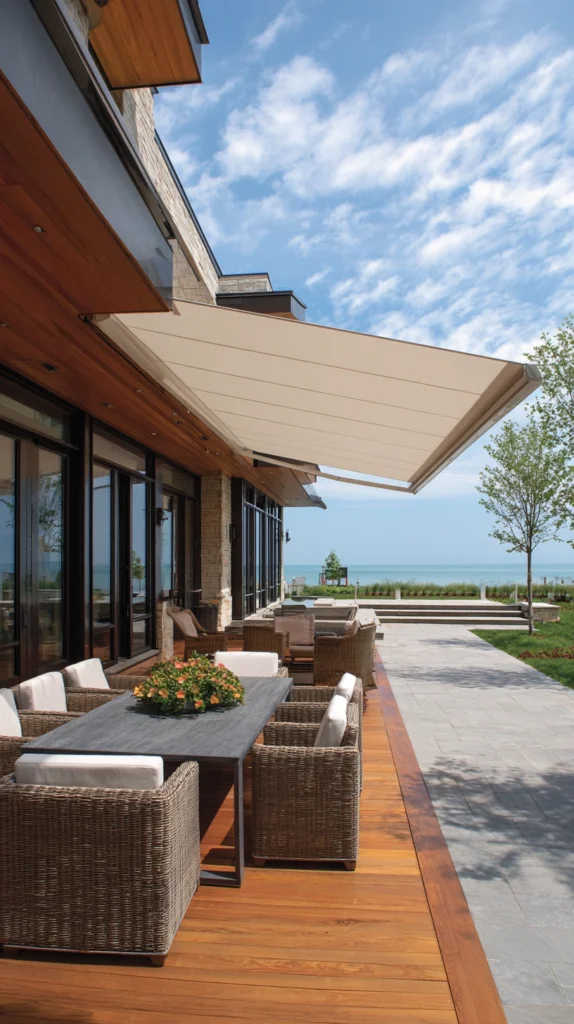
Budget: $300 – $1,500
A retractable awning fixed to the house wall above the patio provides on-demand shade and weather protection that extends the patio’s comfortable use from the brief windows of perfect weather to the full range of conditions that a British or northern European summer produces. A patio with a retractable awning is used in light rain, in direct afternoon sun, and in the shoulder months of May and September that are often the year’s most pleasant outdoor days.
A manual retractable awning of 3 metres in width costs $300–$600. A motorised version with a sun and wind sensor runs $600–$1,500. Choose an awning fabric in solution-dyed acrylic rather than polyester — acrylic resists UV fading for considerably longer than polyester and maintains its appearance through the sustained sun exposure of a patio awning position.
Style tip: Fix the awning wall bracket into the structural masonry of the house wall rather than into the render or the cladding. An awning in wind creates significant leverage on its wall fixings, and a bracket that works perfectly in calm conditions can pull free in the first significant gust if it is fixed into a non-structural surface. The masonry fixing is the safety decision that determines whether the awning is a long-term installation.
10. The Evening Candle and Lantern Collection

Budget: $40 – $200
A collection of outdoor candles and lanterns — pillar candles on varying-height holders at the dining table, floor lanterns at the patio perimeter, hanging lanterns from the pergola structure — gives the patio its evening atmosphere in the same way that the equivalent elements give a dining room its evening identity. Candlelight at table height, lantern light at floor level, and warm festoon lights overhead: the three levels create the layered warmth that makes a patio genuinely atmospheric after dark.
Outdoor pillar candles cost $5–$15 each. Floor lanterns run $10–$30 each. Hanging lanterns cost $10–$25 each. Use pillar candles rather than tea lights in floor lanterns — a pillar candle burns for eight to twelve hours and lasts the full evening; a tea light burns for four and requires replacing mid-evening, interrupting the atmosphere it was creating.
Style tip: Place at least one floor lantern at the entrance to the patio — the point of transition from the garden path to the patio surface — so the approach to the outdoor room is lit as well as the room itself. A lit entrance communicates that the patio was prepared for arrival rather than simply available for use, and that preparation is the quality that distinguishes a stylish patio from a merely equipped one.
11. The Vertical Garden Wall
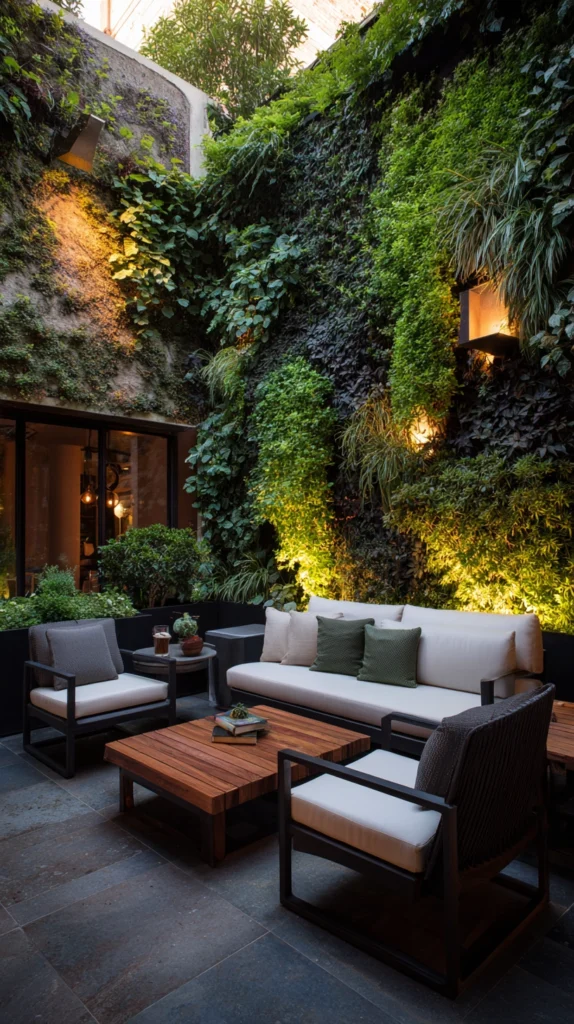
Budget: $60 – $300
A vertical garden on the wall or fence most visible from the patio seating — pocket planters, a trellis with a climbing plant, or a modular wall planter system — transforms the most consistently present backdrop of the patio into a living surface that contributes colour, texture, and fragrance to the outdoor room rather than simply containing it. A patio with a living backdrop feels enclosed by the garden rather than fenced by a boundary.
A pocket felt planter system costs $25–$70. A trellis panel with a climbing rose or jasmine runs $40–$80. A modular wall planter system costs $60–$150. The vertical garden requires more consistent watering than ground-level planting — the exposed pockets lose moisture significantly faster than a border bed — and a drip irrigation line connected to the outdoor tap ($20–$40) is the infrastructure investment that makes a vertical garden on a patio practically sustainable.
Style tip: Plant the vertical garden with a combination of fragrant species — jasmine, scented geranium, herbs — and structural foliage plants that maintain visual interest when the fragrant species are not in flower. A vertical garden that performs only during the flowering season of one or two species is a vertical garden that looks good for six weeks and unremarkable for the remaining months.
12. The Privacy Trellis Screen
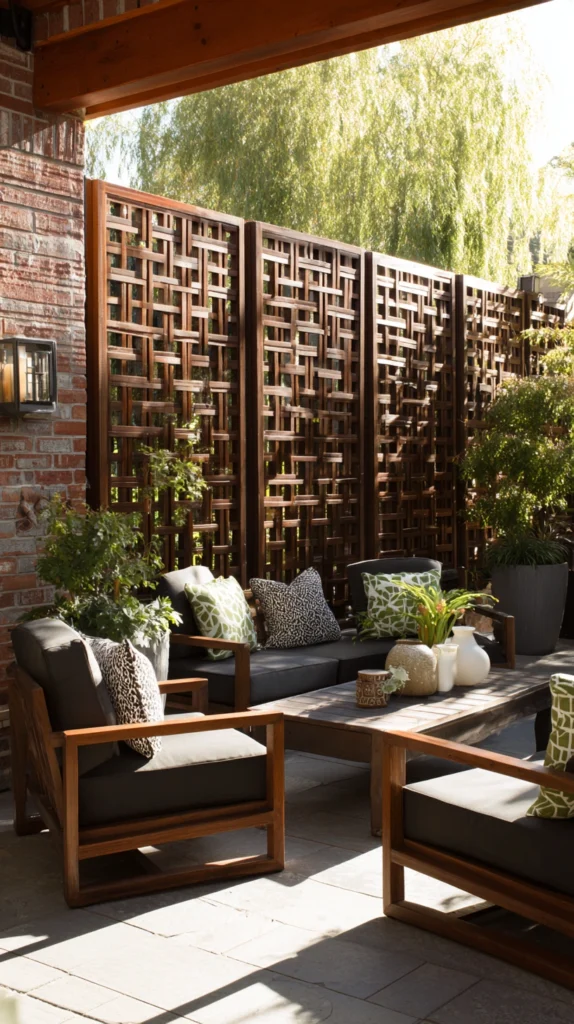
Budget: $80 – $400
A trellis screen on the side of the patio most exposed to neighbouring properties — planted with a fast-growing climber that provides genuine screening within a single season — creates the sense of enclosure that is the foundational quality of a patio that feels like a room. Privacy is the condition most directly responsible for how freely and comfortably a patio is used, and a patio that feels overlooked is always used less than its physical quality deserves.
A timber trellis panel of 180 by 90 centimetres costs $15–$35. A freestanding trellis frame anchored in large planters costs $80–$200. A fast-growing annual climber — sweet peas, morning glory — costs $3–$8 per plant and provides screening within eight to ten weeks. A perennial climber — clematis, climbing hydrangea — takes two seasons to achieve full coverage but requires no annual replanting thereafter.
Style tip: Paint the trellis in the same colour as the fence or wall behind it before installing the climber rather than leaving it in its natural timber state. A trellis that matches its background reads as an extension of the boundary architecture; one in a contrasting or unfinished timber reads as something attached to the boundary. The colour match integrates the screen into the patio rather than adding it to it.
13. The Outdoor Rug and Textile Layer
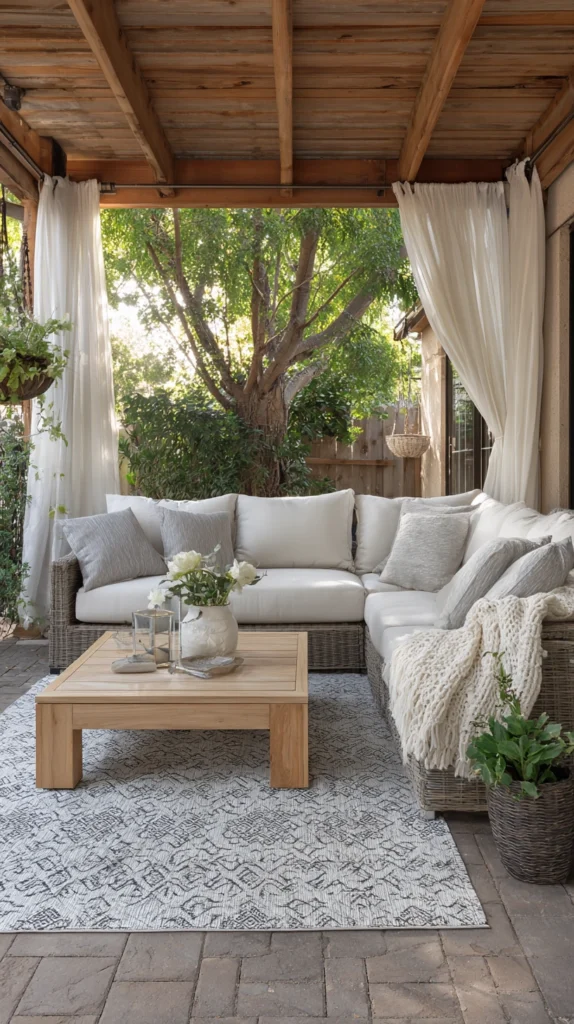
Budget: $80 – $300
An outdoor rug beneath the primary furniture arrangement — combined with weather-resistant cushions, throws in a weatherproof basket, and outdoor curtain panels on the patio’s most exposed side — creates the textile warmth and tactile comfort of an interior living room in an exterior setting. The textile layer is the element that communicates most directly that the patio was designed for the comfort of the people who use it rather than for the visual impression it makes.
An outdoor polypropylene rug of 200 by 300 centimetres costs $60–$150. Weather-resistant cushions run $15–$40 each. A weatherproof throw costs $25–$60. Outdoor curtain panels on a tension wire cost $20–$50 per panel. The textile layer should be stored in a weatherproof box on the patio rather than in the house — accessories stored on the patio are used consistently; the same accessories stored inside are used only when it is convenient to retrieve them.
Style tip: Choose outdoor textiles in a colour palette that was drawn from the patio’s material palette — a tone from the paving, a tone from the planting, a neutral that relates to both. A textile colour that relates to the surrounding materials reads as designed into the space; one chosen independently of the materials reads as added to it.
14. The Scented Evening Border
Budget: $30 – $120
A border of evening-fragrant plants at the edge of the patio seating area — night-scented stock, tobacco plant, jasmine, sweet peas — creates the olfactory dimension of the patio that no visual improvement can replicate. A patio that smells of jasmine on a summer evening is a patio that is experienced differently from any patio that does not, and the fragrance costs less to provide than almost any other quality improvement available at this price point.
Night-scented stock seeds cost $2–$3 per packet. Tobacco plant seeds run $2–$4 per packet. Jasmine in a 3-litre pot costs $8–$20. Sweet pea seeds run $2–$4 per packet. Position the evening fragrance planting on the side of the patio from which the prevailing evening breeze approaches — fragrance carried toward the seated person is more effective and more consistently pleasant than fragrance drifting away.
Style tip: Plant the evening fragrance border in containers on the patio rather than in the garden border beyond it. A container of jasmine immediately beside the seating area releases fragrance at the proximity required for it to be the room’s scent rather than a pleasant smell from somewhere in the garden. The distance between the scent source and the seated person is as important as the quality of the scent.
15. The Considered Finishing Details
Budget: $30 – $150
The finishing details of the stylish patio — a drinks tray on the table before guests arrive, a collection of outdoor candles lit at the correct hour, a vase of cut flowers from the garden at the centre of the dining table, a basket of throws within reach for the cooler hours — are the layer that communicates that the patio was prepared rather than available. The distinction between a prepared patio and an available one is the distinction between a host who thought about the guests before they arrived and one who responded to their needs after they did.
A weatherproof drinks tray costs $15–$35. A quality candle collection costs $20–$50. Cut flowers from the garden cost nothing. A basket of throws runs $20–$60 depending on the throws. The finishing layer is assembled before guests arrive rather than during the gathering — the patio that is ready at the moment of arrival is the patio that communicates the most completely the quality of care that the stylish outdoor setup is ultimately about.
Style tip: Develop a pre-gathering patio checklist — the specific sequence of actions that prepares the patio for use — and follow it consistently rather than assembling the details on the fly. A checklist that takes twenty minutes to complete and is followed for every outdoor occasion produces the consistent quality of a prepared patio rather than the variable quality of a patio prepared differently each time depending on available time and energy.
The stylish backyard patio is the outdoor room that was designed for the specific pleasure of being in it — for the specific evening, the specific meal, the specific conversation, the specific quality of summer air at eight o’clock when the light has gone warm and the jasmine has begun to perform. Every decision — the surface material, the furniture arrangement, the evening light, the fragrant border, the prepared drinks tray — was made in service of that specific experience rather than in service of a general idea of what a patio should look like.
Design the patio for the evening you actually want to spend on it. Furnish it for the specific comfort that evening requires. Light it for the specific warmth that makes the outdoor room feel better than the indoor one. Plant it for the specific fragrance that makes the air worth breathing consciously. And then stock the drinks tray before the guests arrive and let the patio do what it was designed to do.